Files
All example classes in the basic C++ section are defined and implemented in the same .cpp as the main function. However, it is conventional and useful to split classes into multiple files. Generally, the definition of your class goes in its own .h or .hpp file, whereas the implementation goes in its own .cpp file.
There are several benefits of doing this: first and most obvious, it allows you more easily organize your code. Second, if other programmers use your classes—or if you're coming back to it after a while—they can easily open the .h file of your class and see how to use the class API. Third, because code is distributed throughout several files, the compiler only has to compile the files that have changed. This is demonstrated in the GCC + Sublime setup lesson.
This means that the first time you compile your program, the compiler will compile each class (and other .cpp files) individually. Henceforth, it will only need to recompile files that have changed. For example, if you change one class, only that one class will need to be recompiled. This can greatly speed up compile times. Finally, because your class definition is included in an .h file, you can simply #include that file wherever you need to use your class. When #including a file that you’ve created, use quotes (“”) instead of pointy brackets (<>). This tells the compiler to look for the file starting in the current directory.
Including your own classes also means that you only have to #include definitions where you use them. You won't need to include all of your classes all the time. For example, if you had a “card” and a “deck” class, the “card” class may need to be #included in the “deck” class, but if the main file does not have to reference cards, "card.h" does not have to be #included in your main file.
Finally, to prevent a header file from being included more than once in the same compilation unit, you can add the directive "#pragma once" to the top of the file.
card.h
#pragma once

class card {
public:
	card();
	~card();

	void setVal(int v);
	// ...

private:
	int val;
	// ...
};
card.cpp
#include "card.h"

card::card() {
	val = 0;
	// ...
}

card::~card() {
	// ...
}

void card::setVal(int v) {
	val = v;
}

// ...
main.cpp
#include "card.h"

int main() {

	card c;

	c.setVal(10);

	// ...

	return 0;
}
The Build Process
You should know how (in general) how the compiler works to build an executable program from your code. The basic process is very simple: first, the compiler compiles each compilation unit into an object file, then the linker combines the object files into an executable program. A compilation unit is simply a collection of files that #include each other. Most often, a unit starts with a class .cpp file and includes any necessary headers.
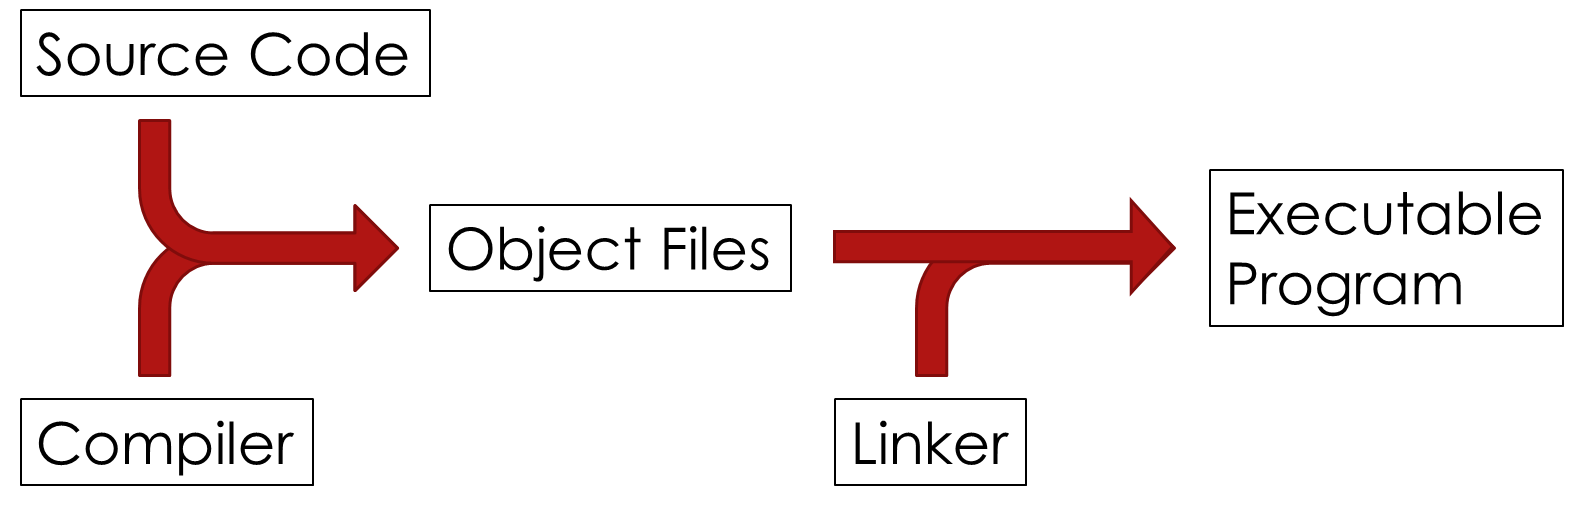
The Compiler
An object file created by the compiler includes the compiled code for that complication unit (in assembly for the specific platform)—but only that code. Calls and references to other compilation units or libraries are still represented by references. For example...
Note: the example assembly code is not at all correct.
main.o
| Instruction | Data |
| mov | ax,'23' |
| mov | di,counter |
| rep | cs,digits |
| [Standard Library Call] | |
| dec | counter |
| [Reference to object.o] | |
object.o
| Instruction | Data |
| call | |
| inc | x |
| mov | bx,1 |
| pushf | |
| [Standard Library Call] | |
The Linker
Next, the linker simply combines the object files, filling in references between compilation units and calls to other libraries. For example...
program.exe
| Instruction | Data |
| mov | ax,'23' |
| mov | di,counter |
| rep | cs,digits |
| call | stdprint |
| dec | counter |
| call | |
| inc | x |
| mov | bx,1 |
| pushf | |
| call | fork |
Finally, your program can be run by the operating system.